Tuesday 24 December 2019

SEASON'S GREETINGS TO ONE AND ALL.


WISHING EVERYONE ON FACEBOOK A MERRY CHRISTMAS AND A HAPPY NEW YEAR.

Friday 20 December 2019

Having fun with a bit of recycling.

This is the cover of my second scrapbook.  I have called it 'For the love of Trees'.   It is made from the cover of a damaged hardback book and I decorated it with a photo of a church door with two yew trees almost grown into the stone of the building, plus a few other embellishments.

As usual my scrapbooks get very fat and wont close now.  The pages are any sheets of paper, of various sizes and colour, that are now surplus to requirement.   I have simply stuck in any pictures of trees which I like, and in places have added lines from related poetry.

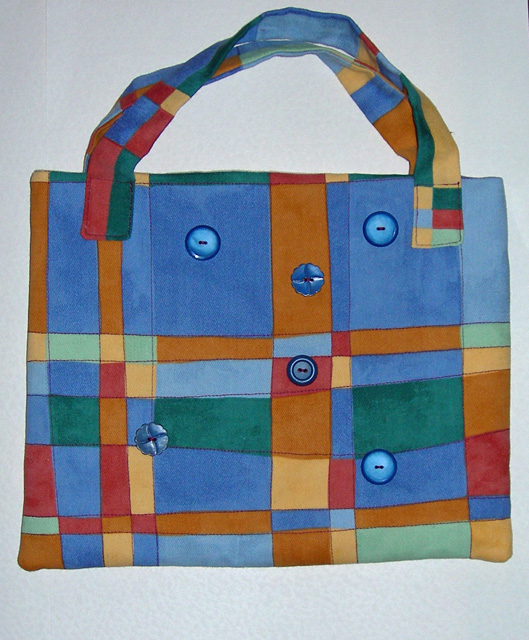
No.3 in the series is 'For the love of Flowers'.  I made the cover for this one from a cereal packet and covered it in floral fabric.  The front is decorated with picture cut from a magazine, mounted onto two layers of paper and trimmed with lace with a butterfly at each corner.   There are still plenty of pages waiting to be filled.    To complete this series I would like to make a scrapbook of birds, and am collecting suitable pictures.

As I was getting a bit bored with just sticking pictures in, I though I would try making smaller books and started with this wrap-around covered one.  Again the pages are any junk mail, letters, leaflets, etc.  The cover is cut from cardboard packing covered inside and out with coloured paper, and the pages are cut to size, grouped into three signatures and stitched to the spine.  I intend to write notes on the paler pages and as some have strong printing and or colour, I will find something decorative to cover those areas.

Going even smaller and again using cardboard for the cover and junk mail for the pages, I covered this one with the top layer of a 3ply table napkin and lined it with the same.

To fill this book I am collecting sayings, quotations and proverbs, etc.

This final book is again made from packaging cardboard and table napkin in a wraparound style.  The pages are oblong in landscape format.  I haven't decided how to use this one but may even get back to drawing again to fill the pages.


To prepared the pages I coated each side of each sheet of paper with gesso and when dry I sponged each side with a strong coffee solution.  Next I used rubber stamps to print small patches of text or shapes all over in order to knock back the original printing.  I have found that a grey stamping ink is better than black, which is a bit too dark.

The only drawback with this pastime is that it can become addictive, and as the junk mail keeps coming I can see that at some point I am going to be overrun by my junk books.

I apologise for the poor quality of my photos but the light today is very bad.  I am looking forward to getting back to those lovely crisp wintry days we had a week ago.   It is strange to think that in one week's time Christmas will have been and gone.  It just doesn't feel Christmassy at all, though I have put up decorations and am quite ready for the day itself.

Here's wishing you all a Merry Christmas and a Happy New Year.

Wednesday 6 November 2019

A weekend treat.


A couple of weeks ago I treated myself to a weekend textile course tutored by Hilary Beattie at a very nice hotel a few miles from where I live.   The theme of the course was 'The Language of Flowers' and we spent the first day doing various drawing exercises followed by more considered drawings of our chosen flower.   We were not allowed pencils for any of this and had to use a fine black pen.  Above is my drawing of clematis.

My piece was smaller than everyone else's as I didn't want to mount mine on a canvas.  However, the work looked very impressive when mounted and each of us went home with a finished piece of work.  I intend to press mine carefully, apply a couple of coats of acrylic wax for protection and used it for the front cover of a sketchbook.
Our drawings were photocopied then traced onto deli paper from which we transferred the design onto our background of collaged fabrics with machine stitching - rather hair-raising as I haven't done any free machining for a long time.  There was a small panel of net behind the drawn image in order to stabilise it for stitching.

These two photos show close ups of the fabric collage behind the drawing.

It was a delightful if exhausting weekend (all that concentrating).  Great tutor, lovely companions, very good food and comfy bed.  One slight drawback for me was the fact that the first night, the couple in the room above mine decided to have a blazing row at about 11pm and went on till 1.30am!  Well, you can't have everything, can you?

Monday 21 October 2019

A bit more playtime.


I am still looking for more ideas to fill the pages of my needlework fabric book, and in the meantime have started a different project.   Above is the cover decoration for a journal-cum-scrapbook based on Nature.   The little plaque at the bottom reads: For the love of Nature.  I found the photo in a copy of the magazine Landscape.  There was overlapping text in the top right corner which I cut out and filled with a tiny photo of a woodpecker.  I am not going to sell the book so copyright will not be a problem.   I placed a small frayed piece of green silk under the left of the photo and added narrow strips of textured paper along the other two sides.   The main background is a slightly larger piece of Khadi paper over a coarse frayed golden fabric.  I added a large leaf button top left and a small tassel made from the pulled threads pulled out from fraying the coarse fabric.  I wrote the words in fine brown pen, cut them out and fixed them behind the little metal plaque with metal brads.  It is rather dull today so I hope my photo will be clear enough.

This made me think of my Mother who would always ask 'What's it for?' when she saw the samples I made during my time at college.  So Mum, this book will be for the love of Nature!

I haven't worked out quite how to tackle the cover but it will be made from tea dyed cotton sheeting over a base of firm cardboard.  The decoration will be glued in place when the cover is made and all the pages have been stitched in.   The pages are just A4 sheets of tea dyed copy paper stitched together in pairs and folded in half to give A5 size.  I would like it to have a rustic look and ideas are all stewing around in my head. 

This is a new departure for me and will be quite a time in the making, but I look forward to finding lots of beautiful and interesting photos to fill it and maybe there will be snippets of poetry added too.

Friday 18 October 2019

Playtime.

I saw a similar little wrap-around note book on Facebook and wanted to try to make one myself.
Above is the front of the book.

This is the back.  The base is a piece of cardboard packaging, decorated with patterned paper napkins and other bits and pieces.

The inside of both notebooks are the same.  The pages are stitched in place down the lefthand crease to allow for the wrap over.

This is the outside of the second notebook which is waiting for it's pages to be stitched in place.  I have learned such a lot during the making of these two and hope I shall remember it all as I would like to make something larger and more artistic, with a Nature theme.

Tuesday 1 October 2019

Work in Progress.

I thought I should return to my first love of stitching to ensure I hadn't forgotten all I learned so many years ago.   I came across the front and back covers of a fabric book, made a while back, and filling it seemed just the thing to get me started.  The cover is made up from scraps and strips of all sorts of fabric - sari ribbon, lace, silk and cotton - with embellishments such as buttons, lace scraps, paper shapes, beads, etc.


I have always like log cabin patchwork so a square had to be included.  I stitched a tiny sewing machine charm in the centre.

I made a lace trimmed pocket on this page, to house a 
C1950s needlecase which once belonged to my mother.

Here I just stitched on various paper and card haberdashery labels
.
More, in similar vein.

And again, with the addition of three decorative wooden flower buttons.

I bonded a heart shaped vintage fabric scrap and trimmed it with narrow flowery lace.  In each corner I added a dorset button.

Another pocket and a possibly Edwardian needlecase which once belonged to my grandmother.  It is made from tartan silk and is literally threadbare in places.

This page has a thimble top left, scrap of lace, scissors bottom right, a dorset button and in the centre a tiny wooden cotton reel.   The borders of each double spread are worked in raised chain band over an automatic machine stitch which gives a ladder pattern.

It has been useful to have some hand sewing to do while I sort out my thoughts for more books in the pipeline.  I am often surprised by the way that my books can take over part the way through the making of them.  They seldom turn out exactly how I had imagined them originally.

I am hoping that my next book will be a mix of drawing and stitch, and probably based on the theme of trees.   However, there are still quite a few more pages to make for the needlework one.

Friday 9 August 2019

Second Childhood?


We paid a visit to a large garden centre recently.  There were various retail outlets under the same roof and shopping was done!   We are not permitted to keep a pet in these flats and I don't think I would want the worry of one any more, and can get plenty of real cuddles with my daughter's dog.


However, at the garden centre there was a huge display of dogs and cats, some of which were so lifelike.  I think they have been cast in resin or something similar.  I would normally choose a dog as a pet but the best ones were too large for a tiny flat, or not really lifelike.  I walked past this puss several times telling myself not to be silly.  When it neared the time to leave I thought 'will I regret not buying it when I get home'?   Obviously the answer was yes.

The top photo is nearer the true colouring but the bottom one shows a bit more detail.  I have called him Orlando, after Orlando the Marmalade Cat from the books by Kathleen Hale which I had as a child.  My neighbours have asked me if he has settled in well.  No need to put butter on his paws.

No, I haven't lost my marbles - just enjoying revisiting childhood.

Friday 19 July 2019

Rain, Lovely Rain.

I thought I needed a beautiful accessory to show off my new chair, so I borrowed this one.
She is very good at sharing it with me!

I started making this little book ages ago and came across it recently so decided it was time I finished it.  The theme is Spring and I seem to have reverted to childhood and rediscovered all my favourite wild flowers that evoke so many memories.  It must be all this talk of wildflower meadows and roadside verges.
  I didn't much like some of the coloured pages, and found them difficult to paint over.  That is why some pages have the motif painted onto a scrap of plain paper.


I think I had better leave wildflowers alone for a while and find another theme, otherwise everything will get very samey.  Several ideas are churning around in my head - it is just a case of picking one to start with.

I hope your gardens are enjoying the rain.  Someone has told me that next week will be another scorcher.   Summer may have arrived late this year but it is certainly making up for lost time.

Sunday 14 July 2019

I forgot a very important part of my previous post!

I forgot to say that after lifting the keys from the fabric after it has been steamed, it needs to be rinsed in salt water to neutralise the vinegar.  It would be wise to wear rubber gloves during this bit as the keys are black and need washing too.  When dry they will still be rusty and can be used again, as can any rusty metal bits you may have.

I think that is everything this time!

Rust Dyeing.

I have been a collector of old keys for some time and have some rather nice ones.  Recently someone offered to add to my collection but when they arrived they were so rusty I couldn't think what to do with them and just put them in a drawer.

 I then came across a video on Pinterest showing how to do rust dyeing and suddenly remembered my rusty keys!

I had to adapt the method slightly as my kitchen is minute and I have no designated craft pots or pans.  As only white vinegar, salt and water were the main ingredients I was not too worried.  I dampened my strips of old sheeting and spread them out onto an old plastic cloth.  The rusty keys went on next, just in rows with space in between and the second and third strips with keys on top.   Then the strips are rolled tightly into a single bundle and fastened with string or elastic bands.

The bundle was then placed into a 50/50 solution of white vinegar and water - enough to cover it - and left overnight.  Next morning nothing seemed to have happened except that the water had taken on a slight rusty tinge.

I found that my unused and unloved (until now) plastic microwave steamer sat perfectly on top of one of my larger saucepans.  The bundle fitted nicely inside it, and I made a lid from two layers of kitchen foil pressed tightly round the rim of the pan.   All that was needed now was to let it steam and simmer for an hour.  It worked a treat and here are the results.   Each strip is about a yard long and six inches wide.


Even the reverse of the fabric gives a good result though a bit gentler.

This one seems to have snuck in twice.

I keep seeing different images among the key shapes, predominantly tree trunks and old sepia drawings.  I have no idea what to do with my strips but will enjoy thinking about that.

I know I am weird but am really pleased with such a good result at my first attempt.  I shall scavenge my way through life now, looking for rusty bits everywhere.  I hope I don't get arrested.

Friday 12 July 2019

Comfort Plus.

Yesterday I took delivery of my new bed and reclining chair from a wonderful family run company called Comfort Plus, based in Letchworth, Herts., but they seem to travel all over the country.  Just over  five weeks ago, a member of the firm came my block of retirement flats to demonstrate various available products, the chair being one of them, and when no-one else volunteered to sit in the demo chair I offered my services.  If I hadn't done so and found just how comfortable and versatile this chair is, I might never have bought one.  Each one really is tailor made for the customer and every one of their items comes with a lifetime guarantee.

I have lymphoedema (I hope that's the right spelling) and this chair seems to be the only one on the market which raises my feet higher than my hips when in reclining position.  I sit with my feet raised but the rest of me is upright, unless I fancy a snooze.  There are other tiny adjustments that I can make to provide better support for my back, shoulders or neck if needed. 

Likewise with the bed, I can sleep with my feet raised each night and if I ever need it, I can raise the top of the bed too.  The bed came with two memory foam pillows and two underbed storage boxes. I can set the bed to the position I want and do not have to do anything more.

I can thoroughly recommend this company for their polite, friendly and professional treatment of customers.  I have no affiliation to them - I am just a very happy customer.


The chair is less cumbersome than my previous one, which alone is a bonus in a small living room. I think it is a very good thing that I have just enrolled in a keep fit class, or I could see myself lolling about in bed or chair and getting no exercise at all!

Friday 5 July 2019

A good haul.

This morning I found all this fabric for £3.99 in our Oxfam shop.

It was all stapled together with goodness knows how many staples - I lost count - and most of them were rusted into the fabric.  Some of them were huge, but no blood was spilled during their removal!

It is always worth taking a look to see what has come in, and I have found several treasures in there.

Sadly the colours are rather washed out in my photos but there is a good range of soft blues, greens and neutrals which will make lovely strong covers for books.  Some pieces are quite generously sized and would make bags.

 I vacuumed before I went out and then spent a couple of hours this afternoon wresting with the staples and sticky strips round the edges of each piece, sprinkling myself and the carpet with little white flecks.  Oh well, I can vacuum again tomorrow.

Wednesday 3 July 2019

Only a drop in the ocean, but ...........

I have just done my first anti-single-use plastic shopping today, and found it far less daunting than I feared.  As it becomes a regular habit I will get more efficient.
I found the staff at my local Tesco supermarket very helpful and understanding, allowing me to use my own containers for some items or wrapping items in greaseproof paper, and accepting my returned unwanted non-recycled plastic when I handed it in to customer services.
I found the re-usable zip fastened freezer bags more useful than some containers so will take more of them next time.
A little more thought is required to make sure I get better results, but as I live alone I have no excuse not to put the effort in.
I understand that working mums would find it far more difficult.  To quote the Tesco slogan 'Every Little Helps'.

Monday 24 June 2019

Experimenting.

I have had a lovely time this morning playing with air dry clay.  I've never used it before but wondered if I could make my own trims and embellishments with it.  I need some tiny flower shapes for something I am working on - you can just see them at the top of this photo, and found some little metal cutters (meant for cake icing I think) among my bits and pieces.  I also found wooden printing blocks quite good too.

The ivy leaves here are made with another cake icing tool which came in a set of three different sizes.

This is one of my favourite molding mats.  I apoligise for not having everything on a better background to give a clearer view, but the clay takes 24 hours to dry and everything was still very soft so I didn't dare to move it.   I did remember to poke tiny holes in each piece so that I could attach them with a couple of stitches to whatever I want to add them.

These are just a few 'tools of the trade'.   I liked the results from a thinner layer of clay but I suppose those will be more brittle.  It wouldn't really matter too much if some of the items were broken as I love trying to make pieces look aged and the odd bit snapped off would add to the effect. 

I am keen to make more pieces but must rein myself in and wait to see whether these are successful.  I shall now prowl round the flat to see what else I can press into clay, for my next session!